I had been struggling with some code that I had to rotate an image whilst drawing it so I decided to sit down and work out a nice way to visualise it as I hadn’t seen anything out there really that explained it very well. This is what I came up with…
In order to visualise it I decided to create a card with an ‘F’ on the front and then trace through the ‘F’ onto the back to that effectively it is mirrored. The purpose of the mirror is to enable me to visualise the case when dealing with images that are mirrored (i.e. UIImageOrientationUpMirrored, UIImageOrientationDownMirrored, etc). Here is an example of my card:

Now we can get to work using that to work out how we might want to translate & rotate a context whilst drawing into. Consider first of all an image that is in the UIImageOrientationDown orientation. So hold your card with the ‘F’ on it with the front facing you and rotate it through 180 degrees. That is the orientation we want to determine the correct transformation matrix for in this case. Now since Quartz draws with the origin in the bottom right, you need to imagine a coordinate system where the y-axis is going up from the bottom to the top of your card and the x-axis is going across from the left to the right. I like to imagine little arrows going up & left from the bottom left corner of my card.
So to get this to draw into our canvas correctly it’s pretty clear that we need to rotate by 180 degrees. A rotation will rotate about the origin of our coordinate system so if we purely rotate by 180 degrees then the image will be drawn the right way up but will lie down and left from the origin. To see why this is, hold your card with your fingers at the bottom left. Now imagine the canvas going up and right from here, the size of the card. Now push the card round from the top right corner by 180 degrees, pivoting about the bottom left. You can see that nothing would be drawn into the canvas! So what we need to do is translate up by the height and right by the width. That then brings the image into the right place in the canvas.
I like to draw out this like so on paper:
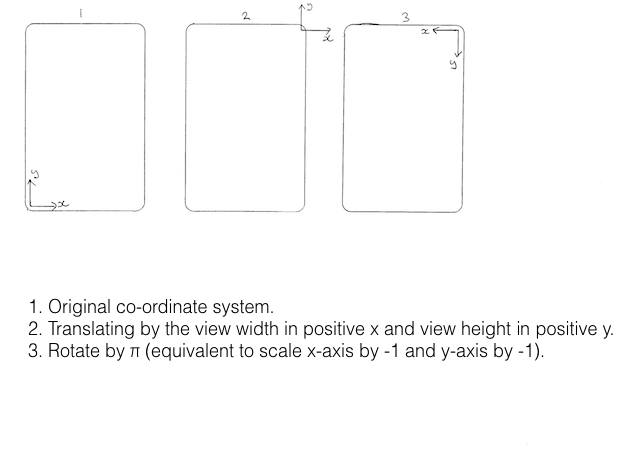
I think this helps explain it because if at all times you keep your little coordinate arrows on your card lined up with the ones in the diagram, you can visualise what’s going on.
Now let’s consider a much more complicated example, the case of UIImageOrientationLeftMirrored. Start with your card on its front and on its side with the long side of the ‘F’ at the bottom. Then flip it over. This is now in the desired orientation.
It’s hard to work out from here what needs to be done but if you follow through the diagram below and at all times keeping your little coordinate arrows on your card aligned with the arrows on the diagram then you should be able to convince yourself that it’s right.
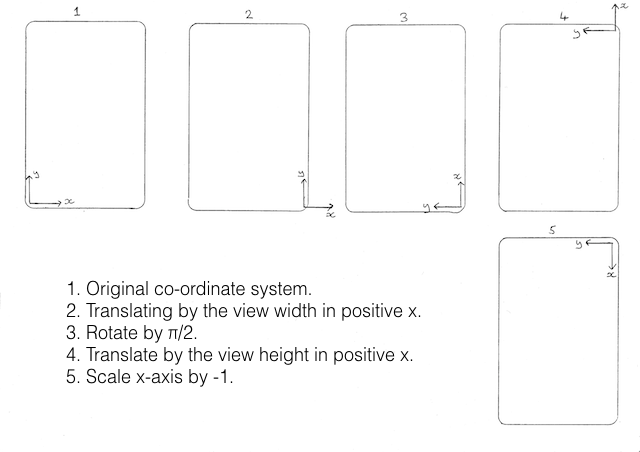
So to follow this you would hold your card with the ‘F’ in the position described above with its bottom left aligned with the bottom left of the canvas ‘1’ on the diagram. Then to get to position 2 you would move the card horizontally across the width of the canvas where your little arrows should line up with the arrows in the diagram on canvas ‘2’. To get to position 3 you would rotate 90 degrees counter-clockwise (i.e. positive rotation – which is rotating from the positive x-axis towards the positive y-axis). Then to get to position 4 you need to move the card vertically, which is a translation in positive x if you look at it carefully. Then finally to get to position 5 you need to flip the card along the y-axis which brings the image into the canvas fully and you’ll notice the ‘F’ is the right way up!
Note that if we want to then draw the image we would need to define the rectangle to draw into with a width equal to the canvas height and a height equal to the canvas width because our x axis is now vertical and our y axis is horizontal. Alternatively think of it that the height of the image is the width of the canvas and the width of the image is the height of the canvas.
I used this method to work out how to draw a UIImage rotated correctly to its upright position. Here is that code:
1 2 3 4 5 6 7 8 9 10 11 12 13 14 15 16 17 18 19 20 21 22 23 24 25 26 27 28 29 30 31 32 33 34 35 36 37 38 39 40 41 42 43 44 45 46 47 48 49 50 51 52 53 54 55 56 57 58 59 60 61 62 63 64 65 66 | |