<![CDATA[Matt Galloway]]>2015-01-05T21:18:22+00:00http://www.galloway.me.uk/Octopress<![CDATA[iOS 7 by Tutorials]]>2013-09-18T20:00:00+01:00http://www.galloway.me.uk/2013/09/ios-7-by-tutorialsThe RayWenderlich.com team has been hard at work after WWDC, once again, to bring this year’s “by tutorials” book. This year it’s, of course, iOS 7 by Tutorials. And today I can announce that we have finally been able to release it now that Apple’s iOS 7 NDA has been released!
The book covers a ridiculous number of things. Here’s the outline (with the chapters I wrote in bold):
Designing for iOS 7
UIKit Dynamics
Custom View Controller Transitions
Text Kit
Transitioning to iOS 7
What’s New in Xcode 5
What’s New in Objective-C and Foundation
Unit Testing in Xcode 5
Beginning Source Control in Xcode 5
Beginning Continuous Integration in Xcode 5
Networking with NSURLSession
Multitasking
JavaScriptCore Framework
AirDrop
Peer-to-Peer Connectivity
Inter-App Audio
What’s New in AVFoundation
What’s New in MapKit
What’s New in Core Location
What’s New in PassKit
Bonus: Introduction to iAd
Also, there is what we’re calling an “iOS 7 Feast”. This is a whole load of free stuff from site including tutorials, updated tutorials and even some stuff we’re giving away!
]]><![CDATA[Book review -- Learning iOS Design: A Hands-On Guide for Programmers and Designers]]>2013-08-10T13:28:00+01:00http://www.galloway.me.uk/2013/08/book-review-learning-ios-design-a-hands-on-guide-for-programmers-and-designersDesign is something that most developers have to do these days. If you’re an indie developer then you’re likely going to need to do the full UX/UI dance yourself. Even if you’re working for a company with a UX/UI team, then you will probably find yourself talking about UX/UI from time to time.
Understanding UX/UI is therefore extremely important.
I had the fortune to be able to review a great book about iOS design. It’s called “Learning iOS Design: A Hands-On Guide for Programmers and Designers”.
And here is my review:
First off – this book is a truly great read.
Most iOS developers will at some point have to do their own design work. That is unless > you’re extremely lucky and have a designer sitting next to you when you’re working on your own projects. If you’re like me, then UX and UI does not come naturally. This book fills in that gap nicely. It delves deep into the scary world of UX and UI and gives some really useful tips. I’ve always done wireframes, but the tips in this book really helped understand what they’re really for. Also I particularly enjoyed the discussion on typography and visual weight.
The third part of the book is all about finding a balance for your own apps. This was a great read to see why and when to use certain patterns. A lot of this content really made me think about my own designs. I shall certainly be flicking back through this in the future when I need inspiration or a reality check.
Overall, a great book. I recommend it for any iOS developer.
I recommend this book to anyone who does any iOS design at all. It’s a valuable resource!
]]><![CDATA[A look inside blocks: Episode 3 (Block_copy)]]>2013-05-26T21:00:00+01:00http://www.galloway.me.uk/2013/05/a-look-inside-blocks-episode-3-block-copyThis post has been a long time coming. It’s been a draft for many months, but I’ve been busy writing my book and didn’t have time to finish it off. But now I’ve finished it and here it is!
Following on from episode 1 and episode 2 of my look inside blocks, this post takes a deeper look at what happens when a block is copied. You’ve likely heard the terminology that “blocks start off on the stack” and “you must copy them if you want to save them for later use”. But, why? And what actually happens during a copy? I’ve long wondered exactly what the mechanism is for copying a block. For example, what happens to the values captured by the block? In this post I take a look.
What we know so far
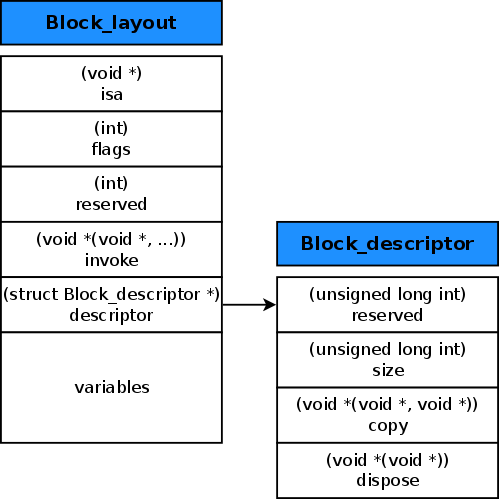
From episodes 1 and 2, we found out that the memory layout for a block is like this:
In episode 2 we found out that this struct is created on the stack when the block is initially referenced. Since it’s on the stack, the memory can be reused after the enclosing scope of the block ends. So what happens then if you want to use that block later on? Well, you have to copy it. This is done with a call to Block_copy() or rather just send the Objective-C message copy to it, since a block poses as an Objective-C object. This just calls Block_copy().
So what better than to take a look at what Block_copy() does.
Block_copy()
First of all, we need to look in Block.h. Here there are the following definitions:
So Block_copy() is purely a #define that casts the argument passed in to a const void * and passes it to _Block_copy(). There is also the prototype for _Block_copy(). The implementation is in runtime.c:
So that just calls _Block_copy_internal() passing the block itself and WANTS_ONE. To see what this means, we need to look at the implementation. This is also in runtime.c. Here is the function, with the irrelevant stuff removed (mostly garbage collection stuff):
staticvoid*_Block_copy_internal(constvoid*arg,constintflags){structBlock_layout*aBlock;constboolwantsOne=(WANTS_ONE&flags)==WANTS_ONE;// 1if(!arg)returnNULL;// 2aBlock=(structBlock_layout*)arg;// 3if(aBlock->flags&BLOCK_NEEDS_FREE){// latches on highlatching_incr_int(&aBlock->flags);returnaBlock;}// 4elseif(aBlock->flags&BLOCK_IS_GLOBAL){returnaBlock;}// 5structBlock_layout*result=malloc(aBlock->descriptor->size);if(!result)return(void*)0;// 6memmove(result,aBlock,aBlock->descriptor->size);// bitcopy first// 7result->flags&=~(BLOCK_REFCOUNT_MASK);// XXX not neededresult->flags|=BLOCK_NEEDS_FREE|1;// 8result->isa=_NSConcreteMallocBlock;// 9if(result->flags&BLOCK_HAS_COPY_DISPOSE){(*aBlock->descriptor->copy)(result,aBlock);// do fixup}returnresult;}
And here is what that method does:
If the passed argument is NULL then just return NULL. This makes the method safe to passing a NULL block.
Cast the argument to a pointer to a struct Block_layout. You may remember what one of these is from episode 1. It’s the internal data structure that makes up a block including a pointer to the implementation function of the block and various bits of metadata.
If the block’s flags includes BLOCK_NEEDS_FREE then the block is a heap block (you’ll see why shortly). In this case, all that needs doing is the reference count needs incrementing and then the same block returned.
If the block is a global block (recall these from episode 1) then nothing needs doing and the same block is returned. This is because global blocks are effectively singletons.
If we’ve gotten here, then the block must be a stack allocated block. In which case, the block needs to be copied to the heap. This is the fun part. In this first step, malloc() is used to create a portion of memory of the required size. If that fails, then NULL is returned, otherwise we carry on.
Here, memmove() is used to copy bit-for-bit then current, stack allocated block to the portion of memory we just allocated for the heap allocated block. This just makes sure that all the metadata is copied over such as the block descriptor.
Next, the flags of the block are updated. The first line ensures that the reference count is set to 0. The comment indicates that this is not needed – presumably because at this point the reference count should already be 0. I guess this line is left in just in case a bug ever exists where the reference count is not 0. The next line sets the BLOCK_NEEDS_FREE flag. This indicates that it’s a heap block and the memory backing it will, once the reference count drops to zero, require free-ing. The | 1 on this line sets the reference count of the block to 1.
Here the block’s isa pointer is set to be _NSConcreteMallocBlock, which means it’s a heap block.
Finally, if the block has a copy helper function then this is invoked. The compiler will generate the copy helper function if it’s required. It’s required for blocks that capture objects for example. In such cases, the copy helper function will retain the captured objects.
That’s pretty neat, eh! Now you know what happens when a block is copied! But that’s only half of the picture, right? What about when one is released?
Block_release()
The other half of the Block_copy() picture is Block_release(). Once again, this is actually a macro that looks like this:
Just like Block_copy(), Block_release() calls through to a function after casting the argument for us. This just helps out the developer, so that they don’t have to cast themselves.
Let’s take a look at _Block_release() (with slight rearrangement for clarity and garbage collection specific code removed):
12345678910111213141516171819202122232425262728
void_Block_release(void*arg){// 1structBlock_layout*aBlock=(structBlock_layout*)arg;if(!aBlock)return;// 2int32_tnewCount;newCount=latching_decr_int(&aBlock->flags)&BLOCK_REFCOUNT_MASK;// 3if(newCount>0)return;// 4if(aBlock->flags&BLOCK_NEEDS_FREE){if(aBlock->flags&BLOCK_HAS_COPY_DISPOSE)(*aBlock->descriptor->dispose)(aBlock);_Block_deallocator(aBlock);}// 5elseif(aBlock->flags&BLOCK_IS_GLOBAL){;}// 6else{printf("Block_release called upon a stack Block: %p, ignored\n",(void*)aBlock);}}
And here’s what each bit does:
First the argument is cast to a pointer to a struct Block_layout, since that’s what it is. And if NULL is passed in, then we return early to make the function safe against passing in NULL.
Here the portion of the block flags that signifies the reference count (recall from Block_copy() the part where the flags were set to indicate a reference count of 1) is decremented.
If the new count is greater than 0, then there’s still things holding a reference to the block and so the block does not need to be freed yet.
Otherwise, if the flags include BLOCK_NEEDS_FREE, then this is a heap allocated block, and the reference count is 0, so the block should be freed. First of all though, the dispose helper function of the block is invoked. This is the antonym of the copy helper function. It performs the reverse, such as releasing any captured objects. Finally, the block is deallocated through use of _Block_deallocator. If you go hunting in runtime.c then you’ll see that this ends up being a function pointer to free, which just frees memory allocated with malloc.
If we made it here and the block is global, then do nothing.
If we made it all the way to here, then something strange has happened because a stack block has attempted to be released, so a log line is printed to warn the developer. In reality, you should never see this being hit.
And that is that! There’s not really much more to it!
What’s next?
That concludes my tour into blocks, for now. Some of this material is covered in my book. It’s more about how to use blocks effectively, but there’s still a good portion of deep-dive material that should be of interest if you enjoyed this.
]]><![CDATA[Effective Objective-C 2.0]]>2013-05-26T11:28:00+01:00http://www.galloway.me.uk/2013/05/effective-objective-c-2-dot-0Well, I’ve been extremely quiet on here recently! That’s because I’ve not only been hard at work over at RayWenderlich.com where I am now an editor as well as a tutorial contributor, but I’ve been finishing off my book, Effective Objective-C 2.0! I can now reveal that it is finally in print and I even have the picture to prove it:
So what is this book then? Well, it’s part of the excellent Effective Software Dev Series, for which Scott Meyers is the series editor. I am absolutely over-the-moon to be able to add to this series with my book. Thanks go out to Scott for letting me be a part of it.
All books in the Effective Software Dev Series are based around a series of “Items”, each of which gives a small, succinct piece of information that you should understand and can learn from. The idea is that you can read each Item separately. They often cross-reference each other so if you find yourself wanting to find out more then you can follow the references.
I encourage all iOS and Mac developers who are post-beginner / intermediate to get their hands on a copy and start reading. You’ll learn something for sure! Even if you’re advanced you will get something out of the book because I go in-depth into a lot of core topics.
Here’s some quick links if you’re wanting to pick up a copy:
]]><![CDATA[Why I've been quiet recently]]>2013-01-12T08:46:00+00:00http://www.galloway.me.uk/2013/01/why-ive-been-quiet-recentlyIf you follow my blog then you’ll notice that I’ve been quiet over the past couple of months. Well, I have been quiet on here, but I have been writing. In fact, I’ve been writing more than I ever have. That’s because I’m authoring a book! I have had the incredible fortune to be able to work with Pearson publishers to produce a book in the “Effective” series that was started with Scott Meyers’ “Effective C++”. I am honoured to be able to write a book in this series.
The title of mine is going to be “Effective Objective-C 2.0”. It aims to be a book that teaches how to use Objective-C properly. It is split into over 50 short “Items” that each explain why you should write code in a certain way, or how to use a certain feature. It will help developers who have already read a beginner text and want to learn more.
The writing is going well and I am very close to finishing the first draft now. Then will come the editing phase, which is slightly daunting but I’m very much looking forward to seeing it turn into a real book!
There’s nothing I can show right now, but it will but on Safari “Rough Cuts” soon (I’ll post a link when it is) so if you want to take a sneak peek you will be able to on there. For now, here are a few links to other books in the series that are also excellent:
]]><![CDATA[A look inside blocks: Episode 2]]>2012-10-12T09:00:00+01:00http://www.galloway.me.uk/2012/10/a-look-inside-blocks-episode-2This is a follow on post to A look inside blocks: Episode 1 in which I looked into the innards of blocks and how the compiler sees them. In this article I take a look at blocks that are not constant and how they are formed on the stack.
Block types
In the first article we saw the block have a class of _NSConcreteGlobalBlock. The block structure and descriptor were both fully initialised at compile time since all variables were known. There are a few different types of block, each with their own associated class. However for simplicities sake, we just need to consider 3 of them:
_NSConcreteGlobalBlock is a block defined globally where it is fully complete at compile time. These blocks are those that don’t capture any scope such as an empty block.
_NSConcreteStackBlock is a block located on the stack. This is where all blocks start out before they are eventually copied onto the heap.
_NSConcreteMallocBlock is a block located on the heap. After copying a block, this is where they end up. Once here they are reference counted and freed when the reference count drops to zero.
A block that captures scope
This time we’re going to look at the following bit of code:
The function called foo is just there so that the block captures something, by having a function to call with a captured variable. Once again, we look at the armv7 assembly produced, relevant bits only:
Well this is very different to before. Instead of seeing a block get loaded from a global symbol, it looks like a lot more work is being done. It might look daunting, but it’s pretty easy to see what’s going on. It’s probably best to consider the function rearranged, but believe me that this doesn’t alter anything functionally. The reason the compiler has emitted the instructions in the order it has is for optimisation to reduce pipeline bubbles, etc. So, rearranged the function looks like this:
Function prologue. r7 is pushed onto the stack because it’s going to get overwritten and is a register which must be preserved across function calls. lr is the link register and contains the address of the next instruction to execute when this function returns. See the function epilogue for more on that. Also, the stack pointer is saved into r7.
Subtract 24 from the stack pointer. This makes room for 24 bytes of data to be stored in stack space.
This little block of code is doing a lookup of the L__NSConcreteStackBlock$non_lazy_ptr symbol, relative to the program counter such that it works wherever the code may end up in the binary when finally linked. The value is then stored to the address of the stack pointer.
The value 1073741824 is stored to the stack pointer + 4.
The value 0 is stored to the stack pointer + 8. By now it may be becoming clear what’s going on. A Block_layout structure is being created on the stack! Up until now there’s the isa pointer, the flags and the reserved values being set.
The address of ___doBlockA_block_invoke_0 is stored at the stack pointer + 12. This is the invoke parameter of the block structure.
The address of ___block_descriptor_tmp is stored at the stack pointer + 16. This is the descriptor parameter of the block structure.
The value 128 is stored at the stack pointer + 20. Ah. If you look back at the Block_layout struct you’ll see that there’s only 5 values in it. So what is this being stored after the end of the struct then? Well, you’ll notice that the value is 128 which is the value of the variable captured in the block. So this must be where blocks store values that they use – after the end of the Block_layout struct.
The stack pointer, which now points to a fully initialised block structure is put into r0 and runBlockA is called. (Remember that r0 contains the first argument to a function in the ARM EABI).
Finally the stack pointer has 24 added back to it to balance out the subtraction at the start of the function. Then 2 values are popped off the stack into r7 and pc respectively. The r7 balances the push from the prologue and the pc will now get the value that was in lr when the function began. This effectively performs the return of the function as it sets the CPU to continue executing (the pc, program counter) from where the function was told to return to, lr the link register.
Wow! You still with me? Brilliant!
The final bit of this little section is to check what the invoke function and the descriptor look like. We would expect them to be not much different to the global block from episode 1. Here they are:
And yep, there’s not much difference really. The only difference is the size parameter of the block descriptor. It’s now 24 rather than 20. This is because there’s an integer value captured by the block and so the block structure is 24 bytes rather than the standard 20. We saw the extra bytes being added to the end of the structure when it was created.
Also in the actual block function, i.e. __doBlockA_block_invoke_0, you can see the value being read out of the end of the block structure, i.e. r0 + 20. This is the variable captured in the block.
What about capturing object types?
The next thing to consider is what if instead of capturing an integer, it was an object type such as an NSString. To see what happens there, consider the following code:
I assume these functions are what gets run when blocks are copied and destroyed. They must be retaining and releasing the object that was captured by the block. It looks like the copy function takes 2 parameters as both r0 and r1 are addressed as if they contain valid data. The destroy function looks like it just takes 1. All of the hard work looks like it’s done by _Block_object_assign and _Block_object_dispose. The code for that is within the block runtime code, part of the compiler-rt project within LLVM.
If you want to go away and have a read of the code for the blocks runtime then take a look at the source which can be downloaded from http://compiler-rt.llvm.org. In particular, runtime.c is the file to look at.
What next?
In the next episode I shall take a look into the blocks runtime by investigating the code for Block_copy and see just how that does its business. This will give an insight into the copy and destroy helper functions we’ve just seen get created for blocks that capture objects.
]]><![CDATA[A look inside blocks: Episode 1]]>2012-10-11T16:56:00+01:00http://www.galloway.me.uk/2012/10/a-look-inside-blocks-episode-1Today I have been taking a look at the internals of how blocks work from a compiler perspective. By blocks, I mean the closure that Apple added to the C language and is now well and truly established as part of the language from a clang/LLVM perspective. I had been wondering just what a “block” was and how it magically seems to appear as an Objective-C object (you can copy, retain, release them for instance). This blog post delves into blocks a little.
The basics
This is a block:
123
void(^block)(void)=^{NSLog(@"I'm a block!");};
This creates a variable called block which has a simple block assigned to it. That’s easy. Done right? No. I wanted to understand what exactly the compiler does with that bit of code.
Further more, you can pass variables to block:
123
void(^block)(inta)=^{NSLog(@"I'm a block! a = %i",a);};
Or even return values from them:
1234
int(^block)(void)=^{NSLog(@"I'm a block!");return1;};
And being a closure, they wrap up the context they are in:
1234
inta=1;void(^block)(void)=^{NSLog(@"I'm a block! a = %i",a);};
So just how does the compiler sort all of these bits out then? That is what I was interested in.
Diving into a simple example
My first idea was to look at how the compiler compiles a very simple block. Consider the following code:
The reason for the two functions is that I wanted to see both how a block is “called” and how a block is set up. If both of these were in one function then the optimiser might be too clever and we wouldn’t see anything interesting. I had to make the runBlockA function noinline so that the optimiser didn’t just inline that function in doBlockA reducing it to the same problem.
The relevant bits of that code compiles down to this (armv7, O3):
This is the runBlockA function. So, that’s fairly simple then. Taking a look back up to the source for this, the function is just calling the block. r0 (register 0) is set to the first argument of the function in the ARM EABI. The first instruction therefore means that r1 is loaded from the value held in the adress stored in r0 + 12. Think of this as a dereference of a pointer, reading 12 bytes into it. Then we branch to that address. Notice that r1 is used, which means that r0 is still the block itself. So it’s likely that the function this is calling takes the block as its first parameter.
From this I can ascertain that the block is likely some sort of structure where the function the block should execute is stored 12 bytes into said structure. And when a block is passed around, a pointer to one of these structures is passed.
Well, that’s pretty simple also. This is a program counter relative load. You can just think of this as loading the address of the variable called ___block_literal_global into r0. Then the runBlockA function is called. So given we know that the block object is being passed to runBlockA, this ___block_literal_global must be that block object.
Now we’re getting somewhere! But what exactly is___block_literal_global? Well, looking through the assembly we find this:
Ah ha! That looks very much like a struct to me. There’s 5 values in the struct, each of which are 4-bytes (long). This must be the block object that runBlockA was acting upon. And look, 12 bytes into the struct is what looks suspiciously like a function pointer as it’s called ___doBlockA_block_invoke_0. Remember that was what the runBlockA function was jumping to.
But what is __NSConcreteGlobalBlock? Well, we’ll come back to that. It’s ___doBlockA_block_invoke_0 and ___block_descriptor_tmp that are of interest since these also appear in the assembly:
That ___doBlockA_block_invoke_0 looks suspiciously like the actual block implementation itself, since the block we used was an empty block. This function just returns straight away, exactly how we’d expect an empty function to be compiled.
Then comes ___block_descriptor_tmp. This appears to be another struct, this time with 4 values in it. The second one is 20 which is how big the ___block_literal_global is. Maybe that is a size value then? There’s also a C-string called .str which has a value v4@?0. This looks like some form of encoding of a type. That might be an encoding of the block type (i.e. it returns void and takes no parameters). The other values I have no idea about.
But the source is out there, isn’t it?
Yes, the source is out there! It’s part of the compiler-rt project within LLVM. Trawling through the code I found the following definitions within Block_private.h:
Those look awfully familiar! The Block_layout struct is what our ___block_literal_global is and the Block_descriptor struct is what our ___block_descriptor_tmp is. And look, I was right about the size being the 2nd value of the descriptor. The bit that’s slightly strange is the 3rd and 4th values of the Block_descriptor. These look like they should be function pointers but in our compiled case they seemed to be 2 strings. I’ll ignore that little point for now.
The isa of Block_layout is interesting as that must be what _NSConcreteGlobalBlock is and also must be how a block can emulate being an Objective-C object. If _NSConcreteGlobalBlock is a Class then the Objective-C message dispatch system will happily treat a block object as a normal object. This is similar to how toll-free bridging works. For more information on that side of things, have a read of Mike Ash’s excellent blog post about it.
Having pieced all that together, the compiler looks like it’s treating the code as something like this:
That’s good to know. It makes a lot more sense now what’s going on under the hood of blocks.
What’s next?
Next up I will take a look at a block that takes a parameter and a block that captures variables from the enclosing scope. These will surely make things a bit different! So, watch this space for more.
]]><![CDATA[What I like about my accountants, Crunch]]>2012-10-11T11:07:00+01:00http://www.galloway.me.uk/2012/10/what-i-like-about-my-accountantsEver since I set up my app development company, Swipe Stack Ltd I have had the pleasure of using Crunch as my accountants. Put simply, they are fantastic. But why do I think that you may ask. Well here are a few reasons why I like them so much.
They provide a very cheap service for forming a limited company. OK, it’s not that hard to set up a limited company but if you’re new to it all then this can be a bit daunting. Crunch have a sister company called GoLimited who can set up a company for you for just £13 inc. VAT. This is cheap for a company formation agency. A lot will charge you many times this amount.
They are extremely quick at replying to queries. I usually email a couple of times each month about various little niggly questions I have. For example how I should go about getting paid from the US for some work in a tax effective manner. One of my dedicated team of accountants will reply to me within a day or two and tell me in-depth information about the best way of going about my business. I guess that one major reason people would be hesitant of Crunch is that they feel they won’t be able to get hold of anyone who knows them personally. This is truly not the case. When I deal with them I feel they remember me completely even though I am just one person in a big list of their clients. Their accountants and account managers really do a great job of remembering me!
Their online book keeping software is excellent. One of the doubts I had about Crunch was the fact that they used their own bespoke online software for bookkeeping. This means that you personally have to enter your invoices and expenses and then they do the rest from the data you give them. This can sound like a lot of work compared to just dumping your invoices and receipts in a shoe box to your accountants. But really, the Crunch online software is fantastic. Entering an invoice or an expense is very easy and you get profit & loss reports at the click of a button to give you up-to-date information about you business.
They integrate with my bank. A brilliant feature introduced since I signed up to Crunch is the ability to link my HSBC bank account directly. They do this through a third party company which then sends on the transactions that happen in my account directly into Crunch. This makes life so much easier as I can quickly reconcile every transaction in my bank account with my invoices & expenses. This helps me keep on top of incomings and outgoings.
They’re just a few reasons why I like Crunch so much, but I do urge you to give them a try if you’re thinking of changing accountants or setting up a new business. They have a free trial period in which you can make full use of their software and talk to them about how they can help you.
]]><![CDATA[Character encoding for iOS developers. Or UTF-8 what now?]]>2012-10-09T22:30:00+01:00http://www.galloway.me.uk/2012/10/character-encoding-for-ios-developers-utf8Character encoding is a really tricky thing to get your head around. You think in terms of characters usually and as a programmer, that serves you well since everything you type will almost certainly from the standard latin alphabet (i.e. a-z, A-z, 0-9 with punctuation marks). It is this set of characters which was first available for use in computers back in the day, but now that computing is worldwide, we needed a means to display characters from all the world’s many languages.
You will no doubt end up dealing with characters (or more likely strings of characters) if you interface with public services where people themselves create the content such as Twitter or Facebook. In this post I aim to explain all you need to know about character encoding from the perspective of an iOS (or Mac) developer.
In the beginning there was ASCII
One of the first things computers needed to be able to do was to store, print and communicate text. This led to the invention of a standard way of encoding text such that all computers could talk to each other and understand each other and it was called ASCII. In short, ASCII is a 7-bit encoding which can therefore encode a total of 128 different characters which is enough to cover the standard latin alphabet. Each character is given a different value including some control characters such as the new line or tab characters. There’s other control characters which I won’t go into, but if you want then you can read more about them over at Wikipedia. Here’s a table of those characters:
The column represents the lower 4 bits and the row represents the upper 3 bits. So for example W is 0x57. This is all well and good but what about other languages’ characters then? What about all those Chinese, Japanese and chickens (yep, you may want to display this “character” – 🐔) out there?! Well that’s where unicode comes in!
Along comes Unicode
Unicode solved the problem of needing to represent more than just the latin set of characters. It aims to define every possible character you could ever want to represent. Each of these characters is called a code-point and each has a unique 32-bit number to represent it within the unicode space. For instance here are some of the code points:
A = U+41
b = U+62
! = U+21
三 = U+4E09
💩 = U+1F4A9
🐔 = U+1F414
If you look back up to the ASCII table, you’ll notice a distinct similarity between the code-point value of the first 3 (the only ones contained within ASCII) and their ASCII value. The is because all ASCII characters are placed within the Unicode space at their ASCII values, to aid backwards compatibility.
Character Encoding
The Unicode standard also defines different standard character encodings. These are crucial standards so that computers can talk to one another and information can be exchanged. They define the way in which you represent in binary, each code-point. ASCII itself is an encoding. So if you wanted to send the word Hello you would send 01001000 01100101 01101100 01101100 01101111 down the wire.
NB: This is slightly simplified with regard ASCII. There are a few different variants of it. See Wikipedia for further information.
However, this encoding only supports the ASCII range and not the full unicode range. That’s where UTF-8 and friends come in…
UTF-8
UTF-8 is a character encoding that can represent the full Unicode range. It does this by using variable width blocks to represent single codepoints. It does this by adopting a clever mechanism whereby the first bits of each byte can be examined to determine how wide the block is, according to the following table:
First byte
Width
0xxxxxxx
1
110xxxxx
2
1110xxxx
3
11110xxx
4
111110xx
5
1111110x
6
All subsequent bytes in a block start with 10. So for example a block of width 3 would be 1110xxxx 10xxxxxx 10xxxxxx. All the x’s in that are then up for grabs to represent a codepoint. So for blocks of width 3, codepoints up to 16 bits can be represented – i.e. up to U+FFFF.
If you look carefully you will notice that UTF-8 is entirely compatible with ASCII. This means that if there’s a document encoded in ASCII, then a reader configured to read as UTF-8 will parse it absolutely fine. That’s useful isn’t it!
As an example, consider the phrase Hello 🐔三💩. Let’s try to work out how that should be encoded:
Char
Codepoint
UTF-8 Binary
UTF-8 Hex
H
U+48
01001000
0x48
e
U+65
01100101
0x65
l
U+6C
01101100
0x6C
l
U+6C
01101100
0x6C
o
U+6F
01101111
0x6F
<space>
U+20
00100000
0x20
🐔
U+1F414
11110000 10011111 10010000 10010100
0xF0 0x9F 0x90 0x94
三
U+4E09
11100100 10111000 10001001
0xE4 0xB8 0x89
💩
U+1F4A9
11110000 10011111 10010010 10101001
0xF0 0x9F 0x92 0xA9
Considering the chicken, U+1F414, look at the UTF-8 binary:
11110000 10011111 10010000 10010100
Removing all of the prefix bits from each byte you end up with:
000 011111 010000 010100
As you’ll see, this is 0x1F414, i.e. the codepoint for the chicken.
Well that’s UTF-8 for you. Pretty simple eh? There’s really not much more to it than that, but if you do want to read up about some more subtleties then check out Wikipedia.
Now onto some more encodings.
UTF-16
UTF-16 is another encoding in the same range as UTF-8, however each and every block in UTF-16 is exactly 2 bytes, 16 bits. This means it is trivial to encode all the codepoints up to U+FFFF but what about codepoints above that you may ask. Well, that’s where the concept of surrogate pairs comes in. These are special pairs of codepoints which when put next to each other represent a higher codepoint. The process goes like this:
Subtract 0x10000 from the codepoint.
Consider the remainder as a 20-bit number.
Of the remaining bits of the codepoint, add 0xD800 to the top ten bits. This becomes the first part of the surrogate pair.
Add 0xDC00 to the bottom ten bits. This becomes the second part of the surrogate pair.
For example, consider the 🐔 character again. This is codepoint U+1F414. So subtracting 0x10000 leaves 0xF414. The top ten bits are 0000111101 which is 0x3D leading to a first surrogate of 0xD83D. The bottom ten bits are 0000010100 which is 0x14 leading to a second surrogate of 0xDC14. So in UTSF-14, the chicken character is encoding as 0xD83D 0xDC14.
You may now be wondering what happens to a codepoint such as 0xD800 in UTF-16. Well, that’s why the range U+D800 to U+DFFF is reserved in Unicode, so that UTF-16 can use those values for this surrogate pairs scheme.
What now?
So why should you care about all this as an iOS developer? Well, you just should. You will very likely at some point in your iOS development get data in from a web service. This is highly likely to be encoding using something like JSON, which just so happens to be a text based encoding. The text itself is of course encoded using a character encoding. The bytes will usually come down the wire to you and pop up in your app as an instance of NSData. You’ll then turn it into a string using NSString’s initWithData:encoding: method. And notice the 2nd parameter – encoding! That’s where you need to know what the encoding is. Although, in reality, you usually just assume UTF-8 since that is by far the most common encoding. Of course really you should work it out properly using something like the Content-Type HTTP header field on the response if using HTTP to transfer the data.
Well, I’d really love to explain more stuff about this, but I don’t have the time right now. Hopefully I’ll get a chance soon to give some more examples and flesh this post out.
]]><![CDATA[Sales increased since iOS 6]]>2012-10-09T21:36:00+01:00http://www.galloway.me.uk/2012/10/sales-increased-since-ios-6A lot of people have been complaining about the new App Store layout in iOS 6. Some developers have particularly been complaining about the fact that their sales are going to drop because it makes it harder for people to find their apps. However, I’ve seen completely the opposite. My sales are steadily increasing.
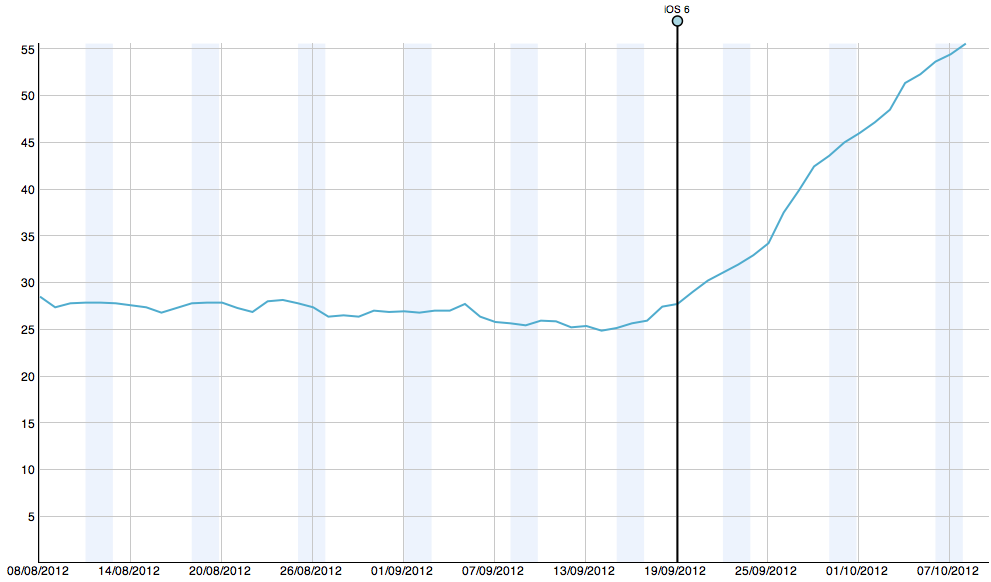
The main app that I’ve seen this in is my iOS app called Subnet Calc. I’ve seen an increase in sales of around 25-30 per day to 55 per day, in a steadily increasing fashion. This increase started the day iOS 6 came out.
Take a look at the graph below which shows a 14 day rolling average of daily sales over the past couple of months. Notice the flat line before iOS 6 launch and then the distinct increase.
I also have a paid version of the app, called Subnet Calc Pro which has also seen an increase in sales. This is likely due to the fact that as more people download Subnet Calc, more will see the pro version as well.
So, it’s not all doom and gloom with the new App Store style. For every person who sees sales reduce, there’ll be someone who sees sales increase. Thankfully for me, my app appears first when you search for “Subnet Calc”. There’s tonnes of copy apps (some even stole my name) and this new layout puts mine infront of them which is great.
]]><![CDATA[Facebook World Hack London - Winners!]]>2012-09-23T19:37:00+01:00http://www.galloway.me.uk/2012/09/facebook-world-hack-london-winnersOn Friday (21st September 2012), myself and 4 friends attended the Facebook World Hack day in London. It was held in the London offices of Facebook and around 200 people attended. Twilio, Pusher and Deezer were also there. The aim was to build something which used the Facebook APIs, with extra points going to teams who incorporated the OpenGraph, a game element or used one of the 3 other companies APIs.
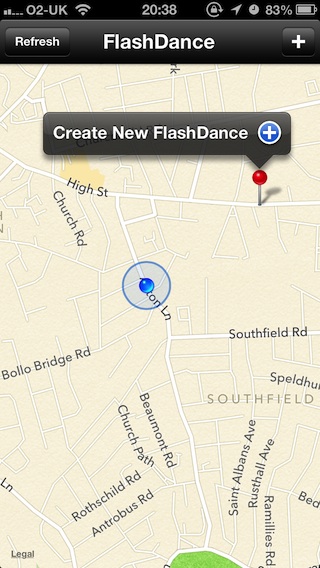
So myself, Michael, Chris, Will and Stevo set about working on the basic idea we had gone to the day with. The idea was called “Flash Dance” and it was to be an app that allowed you to arrange silent discos in a flash mob kind of way.
And so, Flash Dance was born…
We first got set up in the VW campervan tent that Facebook had put up in the office and started to sketch out the idea. It slowly grew into a fully fledged app plan and then we got hacking for real. Here’s a picture of the inside of the tent before any hacking went on:
As the day went on we realised we were not going to get the whole lot finished, so we decided to concentrate on the bits that were important. There needed to be a way to create a flash dance and a way to join a flash dance. Those bits didn’t need to look pretty, but they needed to be functional. That said, Stevo did a ridiculously great job at making it look pretty, just look at the poster he came up with:
And here are some screenshots of what our app turned out like:
So with our app in hand and Michael primed for presentation it came to the bit of the evening where we were to show what we’d done. We did a great presentation and got a lot of laughs out of it which was awesome. Here’s what the presentation part of the evening looked like (this wasn’t us – we were likely still working hard at this point!):
There were 7 prizes up for grabs:
Best use of Twilio
Best use of Pusher
Best use of Deezer
Best use of OpenGraph
Best use of mobile
Best use of gaming
Best overall
And well, our day couldn’t really have gone much better since WE WON THE BEST OVERALL PRIZE! Our prize was an iPad (16GB WiFi) and $250 Facebook advertising credit. We were all ridiculously pleased but also we all have iPads already so we’re going to sell it.
We are also going to finish the app and launch it hopefully in the coming months. It needs a lot of tidying up and some big decisions are to be made. But fingers crossed it’ll all work out fine!
I want to say a final thankyou to Facebook for hosting the event. It was AWESOME.
]]><![CDATA[iOS 6 by Tutorials]]>2012-09-19T20:02:00+01:00http://www.galloway.me.uk/2012/09/ios-6-by-tutorialsFor the past few months (since WWDC) I’ve been co-authoring a fantastic book called iOS 6 by Tutorials. And today I can announce that we have finally been able to release it now that Apple’s iOS 6 NDA has been released!
The book covers a ridiculous number of things. Here’s the outline (with the chapters I wrote in bold):
Modern Objective-C
Auto Layout
UICollectionView
Passbook
In-App Purchase
Social Framework
Challenges with GameKit
Attributed Strings
State Preservation and Restoration
What’s New with Cocoa Touch
What’s New with Storyboards
What’s New with UI Customisation
What’s New with MapKit
What’s New with EventKit
What’s New with CoreImage
Automated Testing
Accessibility
Secrets of Info.plist
The book weighs in at over 1500 pages so it’s well worth the money. In fact for a short time it’s worth it even more since it’s on sale at only $44! Grab it now before it goes up in price.
Also, there is what we’re calling an “iOS 6 Feast”. This is a whole load of free stuff from site including tutorials, updated tutorials and even some stuff we’re giving away!
]]><![CDATA[Hacking up an armv7s library]]>2012-09-13T16:06:00+01:00http://www.galloway.me.uk/2012/09/hacking-up-an-armv7s-libraryNOTE: Please take care with this. I obviously cannot test if this will actually work on a new iPhone 5 device! I provide no warranty if you submit having used this and it doesn’t actually work on the new device. Please think twice before submitting an app which you have used this method to create. You don’t have to submit an armv7s binary. Just set your “Architectures” build setting to armv7 only and submit the resulting binary.
UPDATE: It worked! I tested an app that I’d used this method to build an armv7s slice with. It ran fine on my iPhone 5 :-D.
Well the iPhone 5 has been announced and it just so happens that the architecture it uses is what they’re calling armv7s. This brings in yet another architecture to the mix alongside armv6 and armv7. And I bet you are wondering why you’re getting linker errors when building for armv7s when using external libraries. It’s because those external libraries do not have armv7s versions!
If you run file on the library then you’ll see that there is no armv7s version. For example:
12345
$ file libUAirship-1.2.1.a
libUAirship-1.2.1.a: Mach-O universal binary with 3 architectures
libUAirship-1.2.1.a (for architecture armv7):    current ar archive random library
libUAirship-1.2.1.a (for architecture armv6):    current ar archive random library
libUAirship-1.2.1.a (for architecture i386): current ar archive random library
So what can you do? You could wait for the library to be updated, or you could just follow these steps…
So what’s the deal?
Well, the problem is that when the linker does its merry business linking together all your object files, it is told what architecture to link for. Each of your libraries’ .a files will most likely be what are called “fat” meaning they have more than one architecture in them. But the linker won’t be able to find the armv7s version since it doesn’t exist in there.
But, we know that armv7s is a superset of armv7 (it’s just got a new version of the floating point unit so only adds new instructions). So what we can do is to copy the armv7 part of the library and add it again but tell it that it’s for armv7s. That sounds simple, but there’s more to it than that.
Inside each architecture’s portion of the fat library is something called an object file archive. This contains a collection of .o files that were combined together to form the library. Inside each .o is the code for each method. The linker uses these to build the final app binary, picking all the methods it needs to create the app. The problem is that these .o files also have a header to say what architecture they’re for.
Inside this header (called a Mach-O header) is a field for the CPU type and the CPU subtype. ARM is CPU type 12, armv7 is CPU subtype 9 and armv7s is CPU subtype 11. So, all we need to do is toggle all the 9s to 11s, right? Yup! But that’s easier said than done.
My solution is a script that strips out the armv7 portion of the fat library and then unpacks the archive into its constituent .o files. Then I wrote a little C program to do the 9 => 11 toggling which is run on each of the .o files. Then finally the new .o files are packaged up into a new portion which is re-added to the fat library.
Simple!
So, if you’re ready to get going then read on…
Do you need this to submit an app?
No.
Do not use this unless you really understand what you’re doing. You do not need to submit with an armv7s binary. Just set your Architectures build setting to armv7 only and submit the resulting binary.
A program you’ll need
The first thing you’ll need is the following program written in C:
/* * armv7sconvert <infile> <outfile> * Switches CPU subsystem type to armv7s * * By Matt Galloway - http://www.galloway.me.uk * * Based on g3spot.c from http://redbutton.sourceforge.net (c) Simon Kilvington, 2009 */#include <stdio.h>#include <stdlib.h>#include <stdarg.h>#include <string.h>#include <errno.h>#include <mach-o/loader.h>voidfatal(char*msg,...);voidfatal(char*msg,...){va_listap;va_start(ap,msg);vfprintf(stderr,msg,ap);fprintf(stderr,"\n");va_end(ap);exit(EXIT_FAILURE);}intmain(intargc,char*argv[]){if(argc!=3){fatal("Syntax: %s <in_file> <out_file>",argv[0]);}char*inName=argv[1];char*outName=argv[2];FILE*inFile=fopen(inName,"r");if(inFile==NULL){fatal("Unable to read %s: %s",inName,strerror(errno));}/* find out how big it is */fseek(inFile,0,SEEK_END);longsize=ftell(inFile);rewind(inFile);printf("%s: %lu bytes\n",inName,size);/* read it all into memory */unsignedchar*buf=malloc(size);if(buf==NULL){fatal("Out of memory");}if(fread(buf,1,size,inFile)!=size){fatal("Error trying to read %s: %s",inName,strerror(errno));}if(fclose(inFile)){fatal("Error trying to close %s: %s",inName,strerror(errno));}structmach_header*mach_hdr=(structmach_header*)(buf);printf("Mach magic: 0x%08x\n",mach_hdr->magic);if(mach_hdr->magic!=MH_MAGIC){fatal("Wrong magic number (expecting 0x%08x)",MH_MAGIC);}printf("CPU type: %d\n",ntohl(mach_hdr->cputype));printf("CPU sub-type: %d\n",ntohl(mach_hdr->cpusubtype));printf("*** Changing to CPU sub-type 11\n");mach_hdr->cpusubtype=11;printf("Saving as %s\n",outName);FILE*outFile=fopen(outName,"w");if(outFile==NULL){fatal("Unable to write %s: %s",outName,strerror(errno));}if(fwrite(buf,1,size,outFile)!=size){fatal("Error trying to write %s: %s",outName,strerror(errno));}if(fclose(outFile)){fatal("Error trying to close %s: %s",outName,strerror(errno));}returnEXIT_SUCCESS;}
Copy it, and save it as armv7sconvert.c. Then compile it with:
1
clang -o armv7sconvert armv7sconvert.c
Then add this to ~/bin and add ~/bin to your path by editing ~/.profile and adding:
~/.profile
1
PATH=${PATH}:${HOME}/bin
A script!
Now you’ll want the script which does the hard work of unpacking the library, running the armv7sconvert over the object files and repacking it. Copy and paste the following into a file called armv7sconvert.sh also in ~/bin:
What this does is a bit magical. I’ll explain later when I get chance. But now put this in your path somewhere and call it armv7sconvert.sh. Then run this command on it:
1
chmod +x armv7sconvert.sh
Convert those libraries!
Now go to where your library is located and do this:
1
armv7sconvert.sh libUAirship-1.2.1.a
That should now have the armv7s portion added to it. To confirm, do:
123456
$ file libUAirship-1.2.1.a
libUAirship-1.2.1.a: Mach-O universal binary with 4 architectures
libUAirship-1.2.1.a (for architecture cputype (12) cpusubtype (11)):    current ar archive random library
libUAirship-1.2.1.a (for architecture armv7):    current ar archive random library
libUAirship-1.2.1.a (for architecture armv6):    current ar archive random library
libUAirship-1.2.1.a (for architecture i386): current ar archive random library
You should then see armv7 and armv7s (or it might just say CPU type 12 and CPU sub-type 11 — just another name for armv7s).
And the verdict is…
I had an app that I’d done this little hack on for 4 libraries it used. I created just an armv7s binary and had it ready and waiting for my iPhone 5 to test on. I tested it and it worked like a dream. No problems what-so-ever. So, I would say that it’s a success!
]]><![CDATA[Auto-sorted arrays]]>2012-07-23T23:08:00+01:00http://www.galloway.me.uk/2012/07/auto-sorted-arraysA problem came up whilst I was hard at work at my current job (iOS developer at zeebox) where I needed a list of things that were going to be displayed in a table. These things were going to be ordered based on time but the API I wanted my table view to have was such that it would be given a chunk of new items to display but it didn’t necessarily know where to display them. I would want to animate the changes to the table so when adding a new object I’d need to know where they had been added. So I thought to myself:
Wouldn’t it be nice to have an array which kept itself sorted when you added objects to it and also told you where it had added them?
Consider a situation where you’re showing a objects in a list which have a logical sort order. For example, think of a list of people ordered by their name. You may get an opportunity to add a new object to the array and in the process you want your table view to animate in the change. The usual way of doing this would be the following:
Add the new person to your internal storage array of people.
Sort your array of people.
Figure out where the new person ended up.
Perform the animation now that you know the index of the row which has been added.
This is quite a time consuming process and we can surely do better, right?
My solution
I came up with the idea of an array which you give it a means of ordering itself. Since I wanted compatibility with NSMutableArray I chose to allow the following methods for keeping the array sorted:
Using an array of sort descriptors.
Using a comparator block.
Using a callback function.
Using a specific selector.
These map nicely to NSMutableArray’s sortUsing... method family, which is nice.
Great! That’s how we’d create one of these. But what about the other methods we’d want in such an array. The first really important method is the whole reason for creating this class, which is to add an object and find out where in the array the new object was added. It would also be great to be able to remove objects, so I came up with these two methods:
Implementing this is actually really straight forward. The only tricky bit is ensuring that the array stays sorted when you add to it. The beauty of only allowing addition of single objects at a time, added to the fact that the method for comparison is decided at initialisation means that you can make the optimisation that you know your array is sorted at all times. So addition of an element is O(n).
I decided to stick with blocks being the basis of everything and boil all the comparison methods down into NSComparator blocks. So then it makes the addObject: method really simple. I made the class have a comparator and a mutable array internally, which the insertion and deletion methods will act upon. This is what the class continuation category looks like:
It should be fairly easy to convince yourself how this works. It loops over all the objects currently in the array until it hits one where the result of comparing the object to insert with the iterated object is not NSOrderedDescending. The following example should make you understand that:
Current array:     1  4  6  9
Object to insert:  7
Comparison method: NSNumber's compare: method

Iteration 0:       obj2 = 1
                   result = [7 compare:1] = NSOrderedDescending

Iteration 1:       obj2 = 4
                   result = [7 compare:4] = NSOrderedDescending

Iteration 2:       obj2 = 6
                   result = [7 compare:6] = NSOrderedDescending

Iteration 3:       obj2 = 9
                   result = [7 compare:9] = NSOrderedAscending
In this case we hit the right place to insert when the iteration index was 3, since at that point the result of the comparison was NSOrderedAscending. The object would be added at index 3, so the array would then be:
That just leaves initialising the array and creating the comparator block. The simple case is the initWithComparator: since the comparator has already been created by the caller for us:
Then comes initWithDescriptors:, which is a bit more complicated. This involves looping through an array of descriptors until one finds the two objects to be different, i.e. don’t compare as NSOrderedSame. It should be simple enough to convince yourself that the following implementation gives that:
Finally, that leaves initWithSelector: which is a bit harder. It could be achieved by just using performSelector: but that gives compiler warnings since the compiler cannot know what the return type of the selector is and therefore ARC can’t do it’s thing (imagine if the selector actually returned an object with a +1 reference count – it would be leaked as ARC cannot know at compile time that the selector is going to do this). So I decided to use NSInvocation:
First we need the method signature that the selector is going to conform to. We don’t actually know it, but we have defined in the API of this class that we expect a selector that takes 1 object argument and returns an NSComparisonResult, just like NSMutableArray’s sortUsingSelector: method does. It just so happens that NSNumber has a method that has the same signature, so we use the instanceMethodSignatureForSelector: method to get one. You could have created the signature manually using the ASCII representation of the signature encoding, but this is just easier I think.
Next we create an invocation object with the signature and set the selector.
Then comes creating the comparator…
When the comparator is invoked, the first thing to do is set the target, argument (which is at index 2 because NSInvocation is wrapping objc_msgSend where the first argument to a method is the 3rd argument to objc_msgSend) and then invoke it.
To get the return type, we need to create some memory of the right size and the call getReturnValue: to ask the invocation to fill it in with the return value.
And finally, return the comparison result from the comparator.
There, that wasn’t too bad was it?! That is everything to get the array working!
Enumerating, quickly
Anyone using an array will at some point want to enumerate it. That’s usually done using NSFastEnumeration which looks something like this:
for (id object in array) {
    // Do something
}
Now how can we go about adding that to our class then you are asking? Well, NSFastEnumeration all lies with one method:
- (NSUInteger)countByEnumeratingWithState:(NSFastEnumerationState *)state objects:(__unsafe_unretained id [])buffer count:(NSUInteger)len;
Mike Ash has a very good post about it, but we don’t actually have to do much work. Since there is an NSArray backing this class which already supports fast enumeration, all we have to do is the following:
I implemented a few more methods which you can read the source for on GitHub. Other than that, I will no doubt be adding more to this when I see fit. I also have plans for a dictionary where the keys stay sorted.
]]><![CDATA[Moved to Octopress]]>2012-07-21T16:53:00+01:00http://www.galloway.me.uk/2012/07/moved-to-octopressI have been wondering for a while now about what I should do with my iPhone apps blog. It gets a fair amount of hits at around 5,500 uniques per month which I consider to be fairly good considering I don’t update it any where near as much as I should. I write for the site when I get a chance and mostly it’s just little bits of information I’ve picked up along the way when developing apps, and also there’s a fewtutorials which seem to go down well.
But I needed to do something with the site as it was looking very tired and runs on Wordpress so has a dependency on a database when mostly the content is static. Enter Octopress.
Reasons for switching
There are a number of reasons why I switched blogging platform. Here they are in no particular order.
Wordpress => Octopress
Don’t get me wrong, I have nothing again PHP like some people seem to, but I realised that I should probably give some other things a try. That’s where I found the lovely Octopress. It’s a blogging framework built on top of Jekyll and all written in Ruby. I get the benefit of trying out Ruby which I have to say is very nice.
Database backed => Static files
It’s pretty obvious that a website which is just a bunch of static files is going to outperform a database backed one. Also, if your database goes down for any reason or gets overloaded then you’re in trouble if it’s powering your site also. I now have no dependency on a database so all my database now does is host my DNS records (which to be fair, should also probably be in flat files).
HTML => Markdown
Writing my blog meant that I had to use Wordpress’s HTML editor or copy and paste into it from outside. This was going OK but I had been using Markdown for some other things and realised it would be really nice to be able to write my blog using it. Thankfully, Octopress uses it and so I am writing this post in TextWrangler in Markdown and I can say it’s much nicer!
Where have the comments gone?
There is only one problem I came across when switching and that is comments. Since this site is now 100% static, I don’t have any comments. There are options such as Disqus but I realised that I simply don’t need them. If people want to get in contact with me then the best way is to tweet me or email me.
The future
I hope that since it’s a lot easier for me to write a blog entry now then I shall do more of it and perhaps some more tutorials as well.
]]><![CDATA[How does objc_retainAutoreleasedReturnValue work?]]>2012-02-06T10:55:58+00:00http://www.galloway.me.uk/2012/02/how-does-objc_retainautoreleasedreturnvalue-workEver since I started doing my “A look under ARC’s hood” seriesofblogposts I have been intrigued by objc_retainAutoreleasedReturnValue. It’s been covered by Mike Ash on his blog from a conceptual point of view but I haven’t found a decent explanation into exactly how it works. So I took a look and here’s what I found.
What is it meant to do?
The concept behind objc_retainAutoreleasedReturnValue is that if a value is to be returned from a function autoreleased, but the very next thing that is to be done is a retain on that object then it’s absolutely pointless doing the autorelease and retain – we’re just wasting cycles. So if we can somehow determine that we’re about to retain then we can save a few CPU cycles. Over the course of a running application this could add up to quite a lot of time and effort saved.
objc_autoreleaseReturnValue() examines the caller’s instructions following
the return. If the caller’s instructions immediately call
objc_autoreleaseReturnValue, then the callee omits the -autorelease and saves
the result in thread-local storage. If the caller does not look like it
cooperates, then the callee calls -autorelease as usual.
objc_autoreleaseReturnValue checks if the returned value is the same as the
one in thread-local storage. If it is, the value is used directly. If not,
the value is assumed to be truly autoreleased and is retained again. In
either case, the caller now has a retained reference to the value.
I think there is a typo there in that it should read:
“If the caller’s instructions immediately call objc_retainAutoreleasedReturnValue”
So basically what it means is that if you consider this bit of code:
Just ignore the fact that you wouldn’t really do that, but if we rewrite that to include the retains, releases & autoreleases that will be going on behind the scenes then it looks like this:
Here we notice that there is a [temp autorelease] followed immediately by a [temp retain]. It is this optimisation that the new Objective-C runtime can help us with.
How does it work – objc_autoreleaseReturnValue?
The code is out there for the x86 version of this, but there’s no ARM code so I had to go digging into the disassembly for it.
Here’s the disassembly for objc_autoreleaseReturnValue:
Here we are doing the first bit of our sniffing of the following instructions. lr is the “link register” and contains the address of the method that we’re returning to. Since this method is always called as a tail call, this will contain the address of the caller of our method that’s returning a value autoreleased.
The tst instruction is doing a bitwise AND of the value in lr and the integer value 1. Then the beq will branch if the zero flag is set, i.e. if lr & 1 == 0. So this means that we are testing if the lowest bit is not set. You can either read up about ARM processors or take it from me that if the low bit is set on the link register then it means the caller is in thumb mode. So this means that if we’re going back to ARM code then we branch over a few instructions to 0x6ed8 whereas if we’re going back to Thumb code then we don’t branch.
This is the case that gets run if our condition before was not true. We are loading a half word (16-bits) from lr - 1 into r1 (we need the -1 because of the reason from before that the low bit is set if we’re in Thumb mode so actually the next instruction after return will be at lr - 1). We then put 0x463f into r2. Then we jump to 0x6ee4.
The next section compares the two registers that we’ve just been setting in one of two ways. If they are not equal then we branch over to 0x6ef6
So we’re matching against either 0x463f (if it’s Thumb mode) or 0xe1a07007 (if it’s ARM mode). Why do we care that the instructions that we’re about to run when we return have those particular binary values? Well if we compile a method that does the objc_autoreleaseReturnValue and objc_retainAutoreleasedReturnValue dance then we see that the compiler adds in an instruction which acts as a marker. Let’s see what it looks like:
Well take a look at that. It’s added in a mov r7, r7 in each case which is a noop (i.e. does nothing as it moves r7 back into itself). If you examine the binary values for these instructions then you’ll see they match the values that we were told to compare against. The compiler has added this as a marker to tell the objc_autoreleaseReturnValue that the caller is about to call objc_retainAutoreleasedReturnValue.
This is the code that gets run if the instructions matched. It appears to be getting a value from a coprocessor (the mrc instruction) then acting on it and storing r0 (which will be the value that’s to be returned) into the memory location computed. Then it returns. I’m not entirely sure what this coprocessor magic is doing but it will probably become apparent when we look at the code for objc_retainAutoreleasedReturnValue. But essentially it’s setting some flag that we’ll read later.
00006ef6        f00bfb93        bl      _objc_autorelease
00006efa            bd80        pop     {r7, pc}
Finally, this is where we get to if the instructions did not match. This performs a normal call to objc_autorelease incase the caller is not about to retain the object.
How does it work – objc_retainAutoreleasedReturnValue?
Let’s now take a look at objc_retainAutoreleasedReturnValue:
Here we get some more context on what that mrc was all about before. We can see here that we’re running the same instruction as we did before and doing the same bic instruction and then loading value stored at the computed address into r1.
Now this is the interesting bit. We’re checking that the value we obtained from doing the dance with the coprocessor (r1) is the same as the object passed into this method (r0). If these two match then we know that the object we are trying to retain has just been returned from a method that had called objc_autoreleaseReturnValue. So we don’t need to do anything. It’s not been autoreleased so we’re not going to retain it.
This is the code that then gets run if the comparison was true – i.e. this object had just gone through a objc_autoreleaseReturnValue. We clear out the value in the coprocessor magic dance and return.
00012be0        f7f3f976        bl      _objc_retain
00012be4            bd80        pop     {r7, pc}
If it didn’t match, then we know that this object has not gone through a objc_autoreleaseReturnValue, which is likely because the method we called was not compiled with ARC enabled. So we do a retain.
Phew, so explain that again please?
It’s probably easiest to consider the following pseudo code:
That is basically what it all boils down to and with some tail call optimisations this can all be incredibly optimised compared to all the redundant autorelease followed by retain pairs that we must have had in code before ARC was invented.
Conclusions
This is yet again some awesome stuff from the Apple engineers here. Sniffing the next instructions to be executed is some very clever stuff to ensure that it’s always going to work. They must have to ensure that the marker (mov r7, r7) isn’t moved by the optimiser for instance and I’m sure lots of edge cases but it seems to work a treat!
]]><![CDATA[A look under ARC's hood - Episode 4]]>2012-02-05T13:33:46+00:00http://www.galloway.me.uk/2012/02/a-look-under-arcs-hood-episode-4The next episode of my deep clambering into the underbelly of ARC starts from this Tweet by @steipete where he says “With ARC, I now find myself typing “new” for dumb model objects. Yay or Nay?“. It got me thinking. He’s totally right that with ARC we can now just use [SomeClass new] and let ARC handle all the memory management for us. Previously we’d often create a convenience class method on SomeClass which would return an object autoreleased so that it made the calling code clean and easy to understand the memory management. Now with ARC we don’t need to do that and I wondered what would be the benefit of using new over alloc + init over using our old friends, the convenience class methods. This blog post tells that story.
Allocates a new instance of the receiving class, sends it an init message, and returns the initialized object.
So we should expect a call like [SomeClass new] to be equivalent to [[SomeClass alloc] init]. The memory management here tells us that the returned object is owned by the caller, i.e. it’s returned with a +1 retain count. In the days of pre-ARC, we would therefore have to release this object when we were done with it. ARC adds these in for us as we know.
What’s being tested
What I wanted to know is which is faster out of these methods:
[[SomeClass alloc] init]
[SomeClass new]
[SomeClass giveMeAnObject]
[SomeClass newObject]
Where giveMeAnObject is a convenience method to return an object autoreleased and newObject is a convenience method which we would hope is the same as the standard new.
How to test
In order to benchmark each of these methods I decided to time how long it would take to call each of them a given number of times with correct memory management (well, I have no choice if ARC is enabled). I used this method for timing which gives me the number of nanoseconds that my code took to execute:
12345678
uint64_tstart=mach_absolute_time();// Do something which takes a while uint64_tend=mach_absolute_time();mach_timebase_info_data_ttimebaseInfo;mach_timebase_info(&timebaseInfo);uint64_ttimeNanos=(end-start)*timebaseInfo.numer/timebaseInfo.denom;NSLog(@"time = %"PRIu64,timeNanos);
In order to test this and to ensure there’d be no shortcuts made by the compiler / runtime by using an NSString or an NSNumber I created a simple dummy class called ClassA like so:
Then to benchmark each one I decided to loop for a number of iterations ranging from 1000 to 10000000 for each style of creating an instance of ClassA. Each of these should have the exact same effect, but we’d like to know how they differ in speed. Below is the code I used, commenting out all but one of the ClassA *x = each time I did the test.
For each of these tests I used my iPhone 4 (so ARMv7), running iOS 5.0.1 and compiled the code at O3.
The results are in!
Below are the results of running the tests. The value under each column is the time taken in milliseconds for the number of iterations given on the left.
A
B
C
D
1000
2.264
2.349
2.199
2.394
5000
10.102
10.149
9.993
11.017
10000
19.180
20.148
19.509
20.036
50000
92.357
98.177
104.362
97.099
100000
185.054
199.825
204.560
194.353
500000
924.090
1000.588
1335.106
985.735
1000000
1863.110
1973.086
2885.719
1977.487
5000000
9407.941
10245.857
23314.495
9757.074
10000000
18557.632
20841.905
56602.491
20315.784
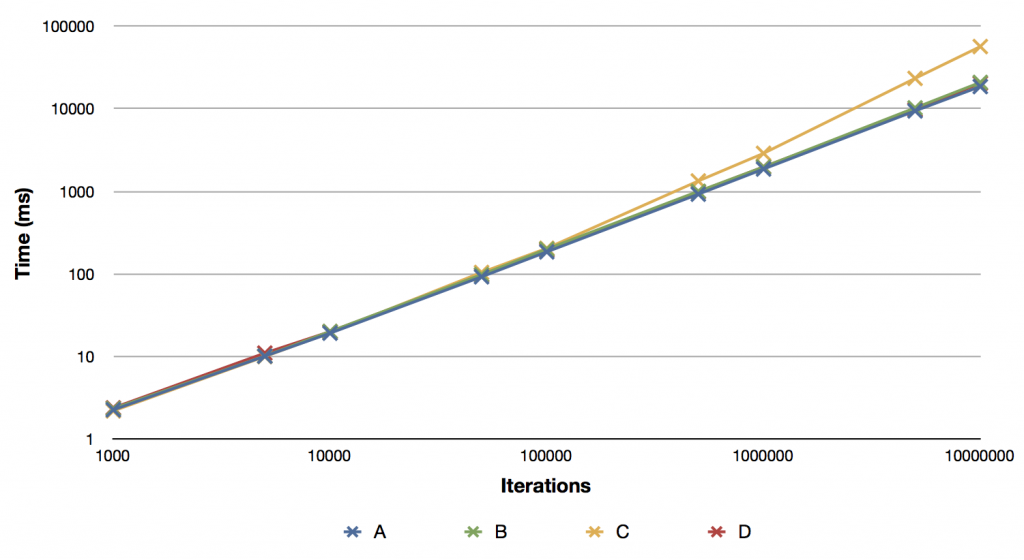
And graphically, that looks like this:
So what does that tell us then? Well it basically tells us that alloc + init is fastest, with new and our custom convenience new close behind. It also shows us that for large iterations, our convenience method that returns the value autoreleased is quite a bit slower. At the maximum number of iterations, it was more than twice as slow as the other methods.
Let’s analyse what happened then
In order to understand what’s going on here, let’s take a look at the code generated. Below are the various interesting bits of code.
So having looked at all the relevant code it might be surprising that these are that different. They’re all going to have a similar number of instructions. Infact method A has in the inner loop more instructions, but it was the fastest. The interesting question is why is method C so much slower than the others for large number of iterations? If we take a look at the generated code for method C we’ll notice that there’s a call to objc_retainAutoreleasedReturnValue. This method is a kind of shortcut to retain a value that will have been returned autoreleased. It should be working with our code since all of this is compiled using ARC and running on an iOS 5 device. It was interesting to me then that this method took twice as long at large numbers of iterations. I can understand that it’s likely to be slower since there’s more message dispatch going on, but I did not expect it to be that much slower and also interesting that the difference increase with increasing number of iterations.
Conclusions
I’m actually at a loss as to how to explain why method C is so much slower. It’s great to see that A, B and D are roughly the same speed, which is of course what we would expect. This whole thing does mean that we are much better off using new, alloc + init or a convenience method that returns an object with a +1 retain count rather than using convenience methods that return the object autoreleased. See below for a reasoning for why method C was slower and how method C can become just as fast as the other methods.
Ah ha! That’s why!
Having done a bit more digging I have found why method C was so much slower. Whilst I was writing this up I thought it was a bit odd that the tail call in giveMeAnObject was to objc_autorelease rather than objc_autoreleaseReturnValue. The magic of objc_retainAutoreleasedReturnValue which I refer to previously only works if the value has been returned with objc_autoreleaseReturnValue. The internals of that are for a later blog post but just take it from me that it works like that. So I decided to just change the return type of giveMeAnObject from ClassA* to id. I thought that this should make absolutely no difference. I was wrong. Take a look and see:
The single difference here is the call to objc_autoreleaseReturnValue rather than objc_autorelease. I still don’t particularly understand why the compiler is doing something different here, so I’ve still to work that one through but The results for the benchmark using this method are as follows (added to the previous results where I’ve called this new method, E):
A
B
C
D
E
1000
2.264
2.349
2.199
2.394
2.401
5000
10.102
10.149
9.993
11.017
11.381
10000
19.180
20.148
19.509
20.036
22.120
50000
92.357
98.177
104.362
97.099
106.966
100000
185.054
199.825
204.560
194.353
223.045
500000
924.090
1000.588
1335.106
985.735
1113.261
1000000
1863.110
1973.086
2885.719
1977.487
2262.960
5000000
9407.941
10245.857
23314.495
9757.074
11419.025
10000000
18557.632
20841.905
56602.491
20315.784
22510.462
So that at least explains why method C was so much slower. But I’ve no idea why the compiler doesn’t emit the same thing when the return type of giveMeAnObject is ClassA* or id.
Update: Turns out, it’s a bug
It turns out that it’s a bug that the compiler (well, the optimiser part of the compiler) did something different for the case of returning id versus ClassA* and the cases of splitting out the alloc + init in the method versus returning on the same line. All of these should compile exactly the same, but they don’t in the current version of clang.
]]><![CDATA[A look under ARC’s hood – Episode 3]]>2012-02-01T10:46:38+00:00http://www.galloway.me.uk/2012/02/a-look-under-arcs-hood-episode-3This instalment of “A look under ARC’s hood” is all about the new @autoreleasepool directive. LLVM tells us that the semantics of autorelease pools has changed with LLVM 3.0 and in particular, I thought it might be interesting to see what ARC is doing when it comes to these.
This is entirely contrived, of course, but it should let us see what’s going on. In non-ARC land we would assume here that number would be allocated inside numberWithInt: and returned autoreleased. So when the autorelease pool is next drained, it will be released. So let’s see if that’s what happened (as usual, this is ARMv7 instructions):
Well, yes. That’s exactly what’s happening. We can see the call to push an autorelease pool then a call to numberWithInt: then a call to pop an autorelease pool. Exactly what we’d expect. Now let’s look at the exact same code compiled under ARC:
Notice the calls to objc_retainAutoreleasedReturnValue and objc_release. What’s happening there is that ARC has determined for us that it doesn’t really need to worry about the autorelease pool that’s in place, because it can simply tell the autorelease to not happen (with the call to objc_retainAutoreleasedReturnValue) and then release the object later itself. This is desirable as it means the autorelease logic doesn’t have to happen.
Note that the autorelease pool is still required to be pushed and popped because ARC can’t know what’s going on in the calls to numberWithInt: and NSLog to know if objects will be put into the pool there. If it did know that they didn’t autorelease anything then it could actually get rid of the push and pop. Perhaps that kind of logic will come in future versions although I’m not quite sure how the semantics of that would work though.
Now let’s consider another example which is where we want to use number outside of the scope of the autorelease pool block. This should show us why ARC is a wonder to work with. Consider the following code:
You might be (correctly) thinking that this is going to cause problems even though it looks perfectly innocuous. It’s a problem because number will be allocated inside the autorelease pool block, will be deallocated when the autorelease pool pops but is then used after it’s been deallocated. Uh oh! Let’s see if we’re right by compiling it without ARC enabled:
Obviously no calls to retain, release or autorelease as we’d expect since we haven’t made any explicitly and we’re not using ARC. We can see here that it’s been compiled exactly as we’d expect from our reasoning before. So let’s see what it looks like when ARC gives us a helping hand:
Round of applause for ARC please! Notice that it’s realised we’re using number outside of the scope of the autorelease pool block so it’s retained the return value from numberWithInt: just as it did before, but this time it’s placed the release at the end of the bar function rather than before the autorelease pool is popped. That will have saved us a crash in some code that we might have thought was correct but actually had a subtle memory management bug.
]]><![CDATA[UIImageOrientation / EXIF orientation sample images]]>2012-01-30T18:18:22+00:00http://www.galloway.me.uk/2012/01/uiimageorientation-exif-orientation-sample-imagesWhilst I was doing some work with images recently I was in desperate need for some sample images which were tagged with the EXIF orientation flag for each of the 8 orientations which are supported by UIImage in its UIImageOrientation metadata. I couldn’t find any already out there, so I made my own. And now I’m posting them here for anyone who might also find this useful. I now have these saved on my iPhone and use them in apps as test images.
]]><![CDATA[How to visualise affine transforms when drawing with Quartz 2D.]]>2012-01-30T18:09:00+00:00http://www.galloway.me.uk/2012/01/how-to-visualise-affine-transforms-when-drawing-with-quartz-2dI had been struggling with some code that I had to rotate an image whilst drawing it so I decided to sit down and work out a nice way to visualise it as I hadn’t seen anything out there really that explained it very well. This is what I came up with…
In order to visualise it I decided to create a card with an ‘F’ on the front and then trace through the ‘F’ onto the back to that effectively it is mirrored. The purpose of the mirror is to enable me to visualise the case when dealing with images that are mirrored (i.e. UIImageOrientationUpMirrored, UIImageOrientationDownMirrored, etc). Here is an example of my card:
Now we can get to work using that to work out how we might want to translate & rotate a context whilst drawing into. Consider first of all an image that is in the UIImageOrientationDown orientation. So hold your card with the ‘F’ on it with the front facing you and rotate it through 180 degrees. That is the orientation we want to determine the correct transformation matrix for in this case. Now since Quartz draws with the origin in the bottom right, you need to imagine a coordinate system where the y-axis is going up from the bottom to the top of your card and the x-axis is going across from the left to the right. I like to imagine little arrows going up & left from the bottom left corner of my card.
So to get this to draw into our canvas correctly it’s pretty clear that we need to rotate by 180 degrees. A rotation will rotate about the origin of our coordinate system so if we purely rotate by 180 degrees then the image will be drawn the right way up but will lie down and left from the origin. To see why this is, hold your card with your fingers at the bottom left. Now imagine the canvas going up and right from here, the size of the card. Now push the card round from the top right corner by 180 degrees, pivoting about the bottom left. You can see that nothing would be drawn into the canvas! So what we need to do is translate up by the height and right by the width. That then brings the image into the right place in the canvas.
I like to draw out this like so on paper:
I think this helps explain it because if at all times you keep your little coordinate arrows on your card lined up with the ones in the diagram, you can visualise what’s going on.
Now let’s consider a much more complicated example, the case of UIImageOrientationLeftMirrored. Start with your card on its front and on its side with the long side of the ‘F’ at the bottom. Then flip it over. This is now in the desired orientation.
It’s hard to work out from here what needs to be done but if you follow through the diagram below and at all times keeping your little coordinate arrows on your card aligned with the arrows on the diagram then you should be able to convince yourself that it’s right.
So to follow this you would hold your card with the ‘F’ in the position described above with its bottom left aligned with the bottom left of the canvas ‘1’ on the diagram. Then to get to position 2 you would move the card horizontally across the width of the canvas where your little arrows should line up with the arrows in the diagram on canvas ‘2’. To get to position 3 you would rotate 90 degrees counter-clockwise (i.e. positive rotation – which is rotating from the positive x-axis towards the positive y-axis). Then to get to position 4 you need to move the card vertically, which is a translation in positive x if you look at it carefully. Then finally to get to position 5 you need to flip the card along the y-axis which brings the image into the canvas fully and you’ll notice the ‘F’ is the right way up!
Note that if we want to then draw the image we would need to define the rectangle to draw into with a width equal to the canvas height and a height equal to the canvas width because our x axis is now vertical and our y axis is horizontal. Alternatively think of it that the height of the image is the width of the canvas and the width of the image is the height of the canvas.
I used this method to work out how to draw a UIImage rotated correctly to its upright position. Here is that code: